Welcome To CHUANGRONG
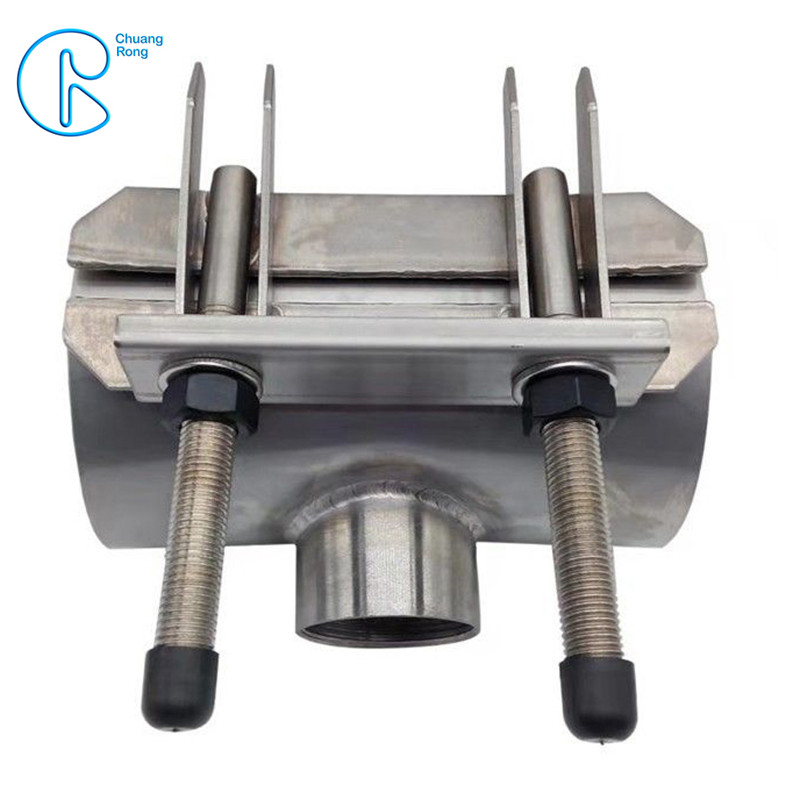
China Wholesale Pipe Repair Clamp Suppliers – Pipe Repair Clamp Stainless Steel Multi-Function Tee Products Repair Leakage – CHUANGRONG
China Wholesale Pipe Repair Clamp Suppliers – Pipe Repair Clamp Stainless Steel Multi-Function Tee Products Repair Leakage – CHUANGRONG Detail:
Detail Information
| Material: | Stainless Steel | Shape: | Tee |
|---|---|---|---|
| Materials: | AISI 304 | Function: | Repair Leak Pipes |
| Technics: | Stamping And Welding | Type: | RCD-T CRT-1 |
| Component / Material | M1 | M2 |
| Skin | 304 / 304L | 316 / 316L |
| Bridge Plate | 304 / 304L | 316 / 316L |
| Junction Plate | 304 / 304L | 316 / 316L |
| Lugs | 304 / 304L | 316 / 316L |
| Locking Plate | 304 / 304L | 316 / 316L |
| Bolt $ Nut | 304 / 304L | 316 / 316L |
- Refer to AS 4181-2013,DIN86128-1/2, CB/T4176-2013
Product Description
Product features:
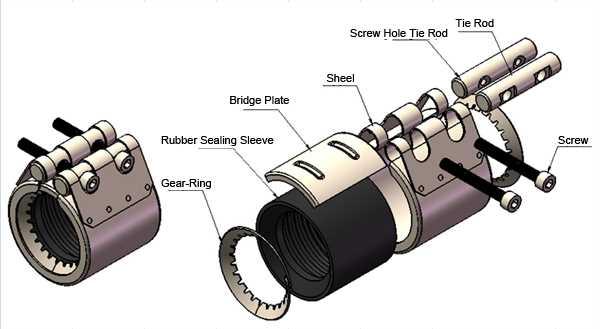
1,The main band type of repair clamp are cast iron pipe,steel,cement tube,PE,PVC,glass steel tube and so on many kinds of pipeline rupture,perforation,and all kinds of crack damage provides a quick and economic repair method can greatly reduce material and labor costs.
2 ,This product installation convenient,quick,need only one person,a wrench can easily finish pipe repair,no longer needs a large number of workers,can need not stopped completely,not replace pipe pressure of piping of fast repair,the circular arc of the degree requirements for pipe low.
3, The stainless steel material,have anticorrosive,high toughness,hardness and other characteristics.
4 ,Band type of repair clamp have Double sealing ring,aft into tapered,as long as it is within the scope of arms hoop size,where all can realize effective overlap,uniform seal.Sealing ring sruface for fine mesh,can adapt to rough,the irregular surface porous pipes,around the entire pipeling sealing circle form effective.
5, This product use the card buckle type connection mode,and the product scope biggest suitable diameter can be up to 30 mm,can greatly reduce inventory,the product specification can be from DN1500-repair width can be up to 2000mm,almost can meet the size of pipe.
For the stainless steel repair clamp
1), clamp body: stailess steel SS 304 .
2), bolts and nuts : stailess steel SS 304 .
3), rubber : NBR/EPDM .
3), rubber : NBR/EPDM .
4), Locking washer palte, Lugs,Receiver bars, Armour: stainless steel 304
5).Work pressure:PN10-PN16
6). packing : wooden cases
For the DI repair clamp
1), clamp parts castings : Ductile iron GGG500-7 with fusion bonded epoxy coating
2), bolts and nuts : Carbon steel , Grade 4.8 , zinc plated .
3), rubber : EDPM .
4), clamp body : Stainless steel SS304 .
5).Work pressure:PN16
6). packing : wooden cases
USE
1) Clamps are designed for use on air,water and gas pipelines.
2) The clamps are dedicated product suited only to SABS 62 steel pipes,metric and imperial PVC pipes.
Material of Construction
1) Shell-Stainless Steel 316
2) Bolts-Steel to BS970 Grade 070M20
3) Bolt coating-zinc plated
4) Rubber Seal-E.P.D.M. to SABS 974
Specification
| DN | Range | Length of 300mm | Length of 400mm | Length of 500mm | |||
| Max Tee Drilling | Pressure | Max Tee Drilling | Pressure | Max Tee Drilling | Pressure | ||
| 80 | 88-110 | DN65 | PN10/PN16 | DN65 | PN10/PN16 | DN65 | PN10/PN16 |
| 80 | 100-120 | DN65 | PN10/PN16 | DN80 | PN10/PN16 | DN80 | PN10/PN16 |
| 100 | 108-128 | DN65 | PN10/PN16 | DN80 | PN10/PN16 | DN80 | PN10/PN16 |
| 100 | 114-134 | DN65 | PN10/PN16 | DN80 | PN10/PN16 | DN80 | PN10/PN16 |
| 100 | 120-140 | DN65 | PN10/PN16 | DN80 | PN10/PN16 | DN80 | PN10/PN16 |
| 100 | 130-150 | DN65 | PN10/PN16 | DN80 | PN10/PN16 | DN100 | PN10/PN16 |
| 125 | 133-155 | DN65 | PN10/PN16 | DN100 | PN10/PN16 | DN100 | PN10/PN16 |
| 125 | 135-155 | DN65 | PN10/PN16 | DN125 | PN10/PN16 | DN125 | PN10/PN16 |
| 125 | 140-160 | DN65 | PN10/PN16 | DN125 | PN10/PN16 | DN125 | PN10/PN16 |
| 150 | 158-180 | DN65 | PN10/PN16 | DN125 | PN10/PN16 | DN125 | PN10/PN16 |
| 150 | 165-185 | DN65 | PN10/PN16 | DN125 | PN10/PN16 | DN125 | PN10/PN16 |
| 150 | 168-189 | DN65 | PN10/PN16 | DN125 | PN10/PN16 | DN125 | PN10/PN16 |
| 150 | 170-190 | DN65 | PN10/PN16 | DN150 | PN10/PN16 | DN150 | PN10/PN16 |
| 150 | 176-196 | DN65 | PN10/PN16 | DN150 | PN10/PN16 | DN150 | PN10/PN16 |
| 150 | 180-200 | DN65 | PN10/PN16 | DN150 | PN10/PN16 | DN150 | PN10/PN16 |
| 150 | 190-210 | DN65 | PN10/PN16 | DN150 | PN10/PN16 | DN150 | PN10/PN16 |
| 150 | 195-217 | DN65 | PN10/PN16 | DN150 | PN10/PN16 | DN150 | PN10/PN16 |
| 150 | 205-225 | DN65 | PN10/PN16 | DN150 | PN10/PN16 | DN150 | PN10/PN16 |
| 200 | 210-230 | DN65 | PN10/PN16 | DN150 | PN10/PN16 | DN150 | PN10/PN16 |
| 200 | 216-238 | DN65 | PN10/PN16 | DN150 | PN10/PN16 | DN150 | PN10/PN16 |
| 200 | 225-246 | DN65 | PN10/PN16 | DN150 | PN10/PN16 | DN150 | PN10/PN16 |
| 200 | 230-250 | DN65 | PN10/PN16 | DN150 | PN10/PN16 | DN150 | PN10/PN16 |
| 225 | 240-260 | DN65 | PN10/PN16 | DN150 | PN10/PN16 | DN200 | PN10 |
| 225 | 250-270 | DN65 | PN10/PN16 | DN150 | PN10/PN16 | DN200 | PN10 |
| 250 | 260-280 | DN65 | PN10/PN16 | DN150 | PN10/PN16 | DN200 | PN10 |
| 250 | 269-289 | DN65 | PN10/PN16 | DN150 | PN10/PN16 | DN200 | PN10 |
| 250 | 273-293 | DN65 | PN10/PN16 | DN150 | PN10/PN16 | DN200 | PN10 |
| 250 | 283-302 | DN65 | PN10/PN16 | DN150 | PN10/PN16 | DN200 | PN10 |
How to choose
Confirm the pipe O.D and leak point of which you want to repair. Choose the a right clamp type(single or double band, the width or length etc). Choose the right size belong to the pipe O.D. You are going to repair. E.g When pipe O.D ≤300mm, the clamp you choose should be at 80mm wider away from the leak point. When pipe O.D≥300mm, the length shoud be at least 100mm wilder for covering the leak point.
Once urgert repair needed to be doned on lagrg pipes, assemble some small range clamps to one several band repair clamp.
1.Make sure of the exact pipe O.D, which needed to be repaired.
2.Choose two or three small range clamps, make sure the sum of their range is equal to the O.Dof the pipe which you want to repair. E.g when repraiing a DN500mm DI pipe, O.D510mm, choose three DN150 clamps which range is 159-170 to make them be right size for this DN500.
3.The small clamps you use to assemble to a big one is not necessary to be the same size, but it would be better to the same.
Installation Instruction
1.Get well-reading before installing . Check parts to ensure that no damage has occurred during transit and that no parks are missing. Check the dimeter of the pipe and clamp specificions (on label)to ensure you have the proper clamp for your application.
2.Clean and eliminate any irregularities on the pipe ends.
3.On each pipe end, make a mark at a distance equal to half the width of the coupling.
4.Without openging the coupling, slide the coupling over on pipe end.
5.Bring the other pipe end a facing popsition. Make sure the pipes are aligned concentrically and that both pipe ends are curreclty supported. See tolerances indicated on the label.
6.Place the coupling between the marks and make sure that the armor is under the bolts. Do not exceed the torque requirements indicated on the product label.
7.Tighten the bolts alternately and evenly to the required torque. If there are three bolts, start with the center bolt, and begin tightening. Do not rotate the coupling or the pipe during or end tightening.
Application
If You Are Interested In Our Products, Please Contact Us, Thank You
Product detail pictures:
Related Product Guide:
Our enterprise insists all along the standard policy of "product high-quality is base of business survival; client satisfaction could be the staring point and ending of an business; persistent improvement is eternal pursuit of staff" as well as consistent purpose of "reputation first, client first" for China Wholesale Pipe Repair Clamp Suppliers – Pipe Repair Clamp Stainless Steel Multi-Function Tee Products Repair Leakage – CHUANGRONG , The product will supply to all over the world, such as: Mecca, Istanbul, Indonesia, Our stock have valued 8 million dollar , you can find the competitive parts within short delivery time. Our company is not only your partner in business, but also our company is your assistant in the coming corporation.
Product quality is good, quality assurance system is complete, every link can inquire and solve the problem timely!
Send your message to us:
Products categories
-

Phone
-

E-mail
-

Whatsapp
-

Skype
-

Top


